This demo shows that the wrapper script terrax can dynamically mount different directories for the microVM at runtime.
Use microVM.nix for extreme isolation for running AI agents.
For the impatient:
- Get the repo
git clone https://github.com/kohane27/agents-in-microvm-nix
cd agents-in-microvm-nix
- Prepare the ssh key
mkdir -p ~/.ssh/microvm
ssh-keygen -t ed25519 -f ~/.ssh/microvm/ssh_host_ed25519_key -N "" -C "microvm-host-key"
- Prepare the user key
ssh-keygen -t ed25519 -f ~/.ssh/microvm-user -N "" -C "microvm-user"
- Replace
usernamewithyour_username
cd agents-in-microvm-nix
find . -type f -name "*.nix" -not -path "./terrax/home-manager.nix" -not -path "./terrax/user.nix" -exec sed -i 's/username/your_username/g' {} +
- Add the public key to
user.nix
PUB_KEY=$(cat $HOME/.ssh/microvm-user.pub)
sed -i "s|.*ssh-ed25519.*| \"$PUB_KEY\"|" ./terrax/user.nix
- Add the following
inputsto your hostflake.nix:
{
    microvm = {
      url = "github:microvm-nix/microvm.nix";
      inputs.nixpkgs.follows = "nixpkgs";
    };

    home-manager = {
      url = "github:nix-community/home-manager";
      inputs.nixpkgs.follows = "nixpkgs";
    };

    sops = {
      url = "github:Mic92/sops-nix";
      inputs.nixpkgs.follows = "nixpkgs";
    };

    # more up-to-date LLM packages
    llm-agents = {
      url = "github:numtide/llm-agents.nix";
      inputs.nixpkgs.follows = "nixpkgs";
    };
}
Copy
agents-in-microvm-nixcontent to your NixOS dotfilessudo nixos-rebuild switchsudo systemctl start microvm@terrax
10 . ssh -i ~/.ssh/microvm-user [email protected]
11 . opencode and test with models that don’t require an API key
Introduction
In my previous article Sandboxing AI agents with jail.nix, I shared using jail.nix to sandbox your AI agent environment. Now we take it one step further by creating an even bigger jail for our AI agents with microVM.nix.
Features/Changes
- Break down Michael Stapelberg’s config into more modular
- Remove his personal
stapelbergnixandconfigfilesso that it’s more accessible and applicable - Add
launcher.nixthat improves the ergonomic of using the microVM, i.e., runterraxon your host machine and “it just works™” - Passing secrets into the microVM with sops-nix
- Dynamically mount and unmount directories rather than hardcoding the directories in the config and then rebuild your NixOS for it to take effect
As you can see below, the home directory is extremely minimal:
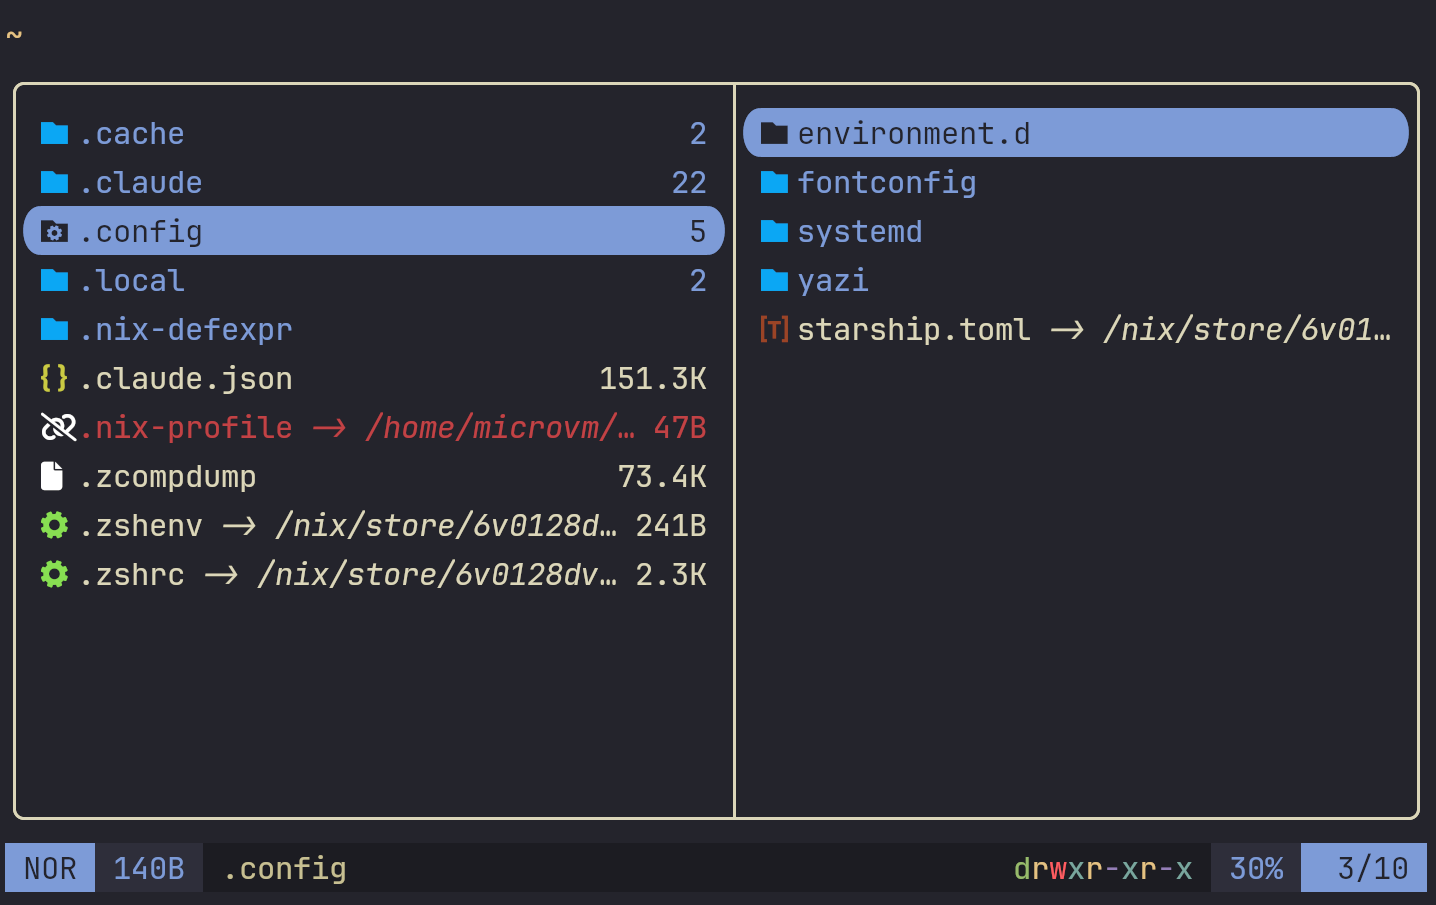
There is no ~/.mozilla or ~/.config/google-chrome with browser cookies that could be stolen. .claude.json and .claude exist because we explicitly added them to the microVM. Running env will not show any sensitive information or other API keys except the one we shared.
Assumptions/Prerequisites
- You’re using flakes for your NixOS system
- The setup assumes the user is using Claude Code with
ANTHROPIC_API_KEYor OpenCode withOPENROUTER_API_KEY(but the config is easy to be adopted to other agents like Gemini) - This setup requires you to adopt it to your config to make it work. There are changes required, which I list below.
Getting Started
The repo accompanying this article is at agents-in-microvm-nix. Please clone it if you’d like to follow along.
microvm and hostname terrax.1. Host Setup
Add the following inputs to flake.nix:
{
    microvm = {
      url = "github:microvm-nix/microvm.nix";
      inputs.nixpkgs.follows = "nixpkgs";
    };

    home-manager = {
      url = "github:nix-community/home-manager";
      inputs.nixpkgs.follows = "nixpkgs";
    };

    sops = {
      url = "github:Mic92/sops-nix";
      inputs.nixpkgs.follows = "nixpkgs";
    };

    # more up-to-date LLM packages
    llm-agents = {
      url = "github:numtide/llm-agents.nix";
      inputs.nixpkgs.follows = "nixpkgs";
    };
}
default.nix
{ ... }:
{
  imports = [
    ./network.nix
    # ./secrets.nix
    ./launcher.nix
    # ./doas.nix
    ./microvm.nix
    ./claude.nix
  ];
}
The top-level default.nix is our entry point: network.nix, secrets.nix, doas.nix and launcher.nix are for your host. For example, network.nix sets up a network bridge on your host for the microVM; secrets.nix uses sops-nix to pass secrets from your host to the microVM.
secrets.nix is commented out to help you get started easier without having to set up sops-nix if you haven’t. After successful ssh microvm, you can come back to it.The bounderies are clear: the above files are prepping your host for the microVM. Files under terrax/, on the other hand, set up the microVM.
microvm.nix
It’s the entry point for setting up our microVM.
network.nix
One noteworthy config is systemd.network.wait-online.enable = false;. I’m using NetworkManager to manage the Wi-Fi on my laptop, so the systemd-networkd only handles the microVM bridge, not the external connection. Otherwise, host’s nixos-rebuild switch would time out waiting for the connection.
secrets.nix
It mounts the API secrets to microVM:
systemd.services.terrax-prepare-secretsis usingsystemdservice to copy the two API keys to/var/lib/microvms/terrax/secrets/.In
terrax/microvm.nix, we have the following:
{
  proto = "virtiofs";
  tag = "terrax-secrets";
  source = "/var/lib/microvms/terrax/secrets";
  mountPoint = "/run/secrets";
}
Such that inside the microVM, the secret is readable at /run/secrets/openrouter_api_key etc.
- In
terrax/zsh.nix, we have the following such thatecho $OPENROUTER_API_KEYandecho $ANTHROPIC_API_KEYwork inside the VM and can be used by the respective agents:
{
  programs.zsh = {
    initContent = ''
      if [ -f /run/secrets/anthropic_api_key ]; then
        export ANTHROPIC_API_KEY=$(cat /run/secrets/anthropic_api_key)
      fi
      if [ -f /run/secrets/openrouter_api_key ]; then
        export OPENROUTER_API_KEY=$(cat /run/secrets/openrouter_api_key)
      fi
    '';
  };
}
For further info on sops-nix, I recommend reading Managing Secrets in NixOS Home Manager with SOPS, which helped me a lot when I was setting it up. Also, special thanks to Using microvm.nix to sandbox Openclaw for the systemd service idea.
terrax/microvm.nix and launcher.nix
- Don’t forget to replace the
HOST_WORKSPACE_ROOT’susernamewith your host machine’s username. - Change
exec claude --dangerously-skip-permissionstoexec opencodeif you’re using OpenCode.
They are responsible for dynamically mounting different project directories at runtime.
launcher.nixmounts the project dir to/home/username/.local/share/microvms/terrax/workspaceterrax/microvm.nixmount the same/home/username/.local/share/microvms/terrax/workspaceto/tmp/workspace
The result is that inside the microVM, /tmp/workspace always refers to the project directory, giving it the illusion of “dynamically” changing directory at runtime.
They improve the ergonomic of using the microVM in two ways:
- Without it, we need to run the following every time:
sudo systemctl restart microvm@terrax
# wait until the microvm is ready
ssh microvm
cd /tmp/workspace/
claude --dangerously-skip-permissions
The launcher automates the above steps and added some niceties for robustness and cleanup.
- It swaps which directory is mounted at the same fixed workspace path before starting the microVM, such that it can access different directories without having to configuration.
The alternative would be the following if you want to use the microVM on, say, $HOME/repo/rustlings:
I. Add the following to terrax/microvm.nix
{ ... }:
{
  microvm = {
    shares = [
      {
        proto = "virtiofs";
        tag = "ro-store";
        source = "/home/username/repo/rustlings";
        mountPoint = "/home/microvm/repo/rustlings";
      }
    ];
  };
}
II. Run sudo nixos-rebuild switch and wait for your system to rebuild
III. ssh microvm
IV. cd /home/microvm/repo/rustlings
V. opencode or claude --dangerously-skip-permissions
That would get tedious real fast.
doas.nix
It’s also just for convenience. When we run terrax, it won’t ask for your sudo password. I have commented it out by default if you don’t want this behavior.
- Make sure you have
doason your host machineenvironment.systemPackages. - Don’t forget to replace the above
usernamewith your host machine’s username.
2. microVM setup
terrax/default.nix
It is our entry point for the microVM. In the imports you can see the following imports:
  imports = [
    ./locale.nix
  ];
On my personal config the import is ../../../../modules/nixos/hardware/locale.nix. This shows you the power of NixOS: it references my host’s locale.nix. There is no duplicate code for setting up my host and microVM’s locale.
I’m also using numtide/llm-agents.nix for more up-to-date packages.
terrax/locale.nix
Add your time.timeZone = lib.mkDefault ""; and the correct locale.
terrax/home-manager.nix
In my personal dotfile I have the following:
{
  home-manager = {
    users.microvm = {
      imports = [
        ../../../../modules/home-manager/cli/starship
        ../../../../modules/home-manager/cli/yazi
      ];
    };
  };
}
Again, it references my host’s starship and yazi such that it’s nicer to work with when I need to ssh microvm.
terrax/microvm.nix, terrax/sshd.nix, terrax/user.nix
They are responsible for authentication such that ssh microvm just works™.
- On your host machine, generate a new SSH key pair:
mkdir -p ~/.ssh/microvm
ssh-keygen -t ed25519 -f ~/.ssh/microvm/ssh_host_ed25519_key -N "" -C "microvm-host-key"
- In
terrax/microvm.nix, the following mounts your host’s/home/username/.ssh/microvmto the microVM’s/etc/ssh/host-keys:
{
  proto = "virtiofs";
  tag = "ssh-keys";
  source = "/home/username/.ssh/microvm";
  mountPoint = "/etc/ssh/host-keys";
}
username with your host machine’s username.In
terrax/sshd.nixit uses thehostKey.path/etc/ssh/host-keys/ssh_host_ed25519_keyfor authentication.In
terrax/user.nix, create a new user that is authenticated to SSH into the microVM:
ssh-keygen -t ed25519 -f ~/.ssh/microvm-user -N "" -C "microvm-user"
Take the generated ~/.ssh/microvm-user.pub key and add it to users.users.microvm.openssh.authorizedKeys.keys.
On my host machine ~/.ssh/config I have the following:
Host microvm
  HostName 192.168.83.6
  User       microvm
  IdentityFile ~/.ssh/microvm-user
The end goal is that we can just use ssh microvm instead of ssh -i ~/.ssh/microvm-user [email protected] for passwordless authentication and changing the SSH keypair.
The moment of truth
sudo nixos-rebuild switchStart the microVM with
sudo systemctl start microvm@terrax.Check its status with
sudo systemctl status microvm@terrax:
➜ sudo systemctl status microvm@terrax
● [email protected] - MicroVM 'terrax'
     Loaded: loaded (/etc/systemd/system/[email protected]; static)
    Drop-In: /nix/store/cnh9a7zw3yrnw6k1wizlna5i373q0ixq-system-units/[email protected]
             └─overrides.conf
     Active: active (running) since Wed 2026-02-18 20:04:17 GMT; 46s ago
 Invocation: 9fbf076cec184498b1968639b8a55be0
    Process: 996229 ExecStartPre=/nix/store/riknx3la3y8gs633j6hrj6ih7bryng72-unit-script-microvm_-pre-start/bin/microvm_-pre-start (code=exited, status=0/SUCC>
   Main PID: 996234 (cloud-hyperviso)
         IP: 0B in, 0B out
         IO: 8K read, 6.6M written
      Tasks: 44 (limit: 37613)
     Memory: 721.7M (peak: 723M)
        CPU: 12.887s
     CGroup: /system.slice/system-microvm.slice/[email protected]
             └─996234 microvm@terrax --cpus boot=8 --watchdog --kernel /nix/store/dslmcyd0p4aq5hnvf7dnrr89jb8h90y1-linux-6.18.10-dev/vmlinux --initramfs /nix/>

Feb 18 20:04:25 microvm-user microvm@terrax[996234]: [  OK  ] Started Serial Getty on hvc0.
Feb 18 20:04:25 microvm-user microvm@terrax[996234]: [  OK  ] Started Serial Getty on ttyS0.
Feb 18 20:04:25 microvm-user microvm@terrax[996234]: [  OK  ] Reached target Login Prompts.
Feb 18 20:04:25 microvm-user microvm@terrax[996234]: [  OK  ] Reached target Multi-User System.
Feb 18 20:04:27 microvm-user microvm@terrax[996234]: [92B blob data]
Feb 18 20:04:27 microvm-user microvm@terrax[996234]:
Feb 18 20:04:27 microvm-user microvm@terrax[996234]: <<< Welcome to NixOS 26.05pre-git (x86_64) - ttyS0 >>>
Feb 18 20:04:27 microvm-user microvm@terrax[996234]:
Feb 18 20:04:27 microvm-user microvm@terrax[996234]: Run 'nixos-help' for the NixOS manual.
<<< Welcome to NixOS 26.05pre-git (x86_64) - ttyS0 >>> mean it’s booted up and running!
ssh -i ~/.ssh/microvm-user [email protected](orssh microvmif you have set up~/.ssh/config)Run the following commands to see if the secrets are set up:
echo $ANTHROPIC_API_KEY
echo $OPENROUTER_API_KEY
- On your host machine, change to some project directory and run
terrax. You should be dropped to the microVM withclaudealready running!
If there are any errors, remember to first sudo nixos-rebuild switch and then sudo systemctl restart microvm@terrax before any changes are taken effect.
Should you use jail.nix or microVM.nix?
It comes down to your threat level tolerance and convenience needs. microVM.nix offers high isolation (Guest Kernel) but it’s also much more complicated to set up (relative to jail.nix anyway). Also, as you can see from the demo, every time we run terrax, it restarts the microVM and it takes around 18 seconds before we can use it.
Personally, I use microVM.nix when I run any new and unfamilar projects and jail.nix for familiar ones. If you think using a microVM is too resource intensive, or too complex to setup, or startup time too long, I recommend using Sandboxing AI agents with jail.nix.
Conclusion
If you encounter any problems feel free to open an issue on the repo https://github.com/kohane27/agents-in-microvm-nix.
Special thanks to Coding Agent VMs on NixOS with microvm.nix for the initial configuration setup and inspiration!
Thank you for reading!