Image generated by DALL-E-3
Introduction
If you think it’s as straightforward as installing Ubuntu, you’re in for a big surprise. There are so many gotchas along the way that I have to write it down for my future self, and hopefully for some other poor souls that stumble upon this article.
Goals
Use librephoenix-nixos-config (thank you for helping us get started!) in a VirtualBox’s VM
SSH from our host machine to the guest NixOS machine for the installation process (so that we can run commands through our host terminal)
Use the “Shared Folders” feature to map host
~/.dotfilesto the guest’s~/.dotfiles(so that we can use our host’s environment (Neovim or Emacs) to edit the config)
The reason for 2. and 3. is quality-of-life improvement for our experience.
Before We Begin: Gotchas
Gotcha 1: USE Minimal ISO image and save yourself a world of pain.
When I first tried out, I used the KDE Plasma5 graphical ISO image and there were a tons of problems (see below). The short answer is just use the minimal ISO to avoid the following gotchas.
If you, for some reason, insist on using a graphical installer, see below gotchas:
Gotcha 2: DO NOT let the VM sleep and screen lock
Something will break. I had a scenario where KDE locked the screen during nixos-rebuild switch. I can’t enter the password and it’ll keep on a loop saying wrong password even though I was not typing at all. Other times, I logged in and something was wrong. To avoid, this - Go to “Hardware” > “Energy Saving” and uncheck all the boxes; Do the same for “Workspace Behavior” > “Screen Locking”
Gotcha 3: DO NOT use the Calamares Intaller
The Calamares Intaller, for some reason, didn’t create the boot partition. Running sudo nixos-rebuild switch --flake ~/.dotfiles#system produces the following error output:
efisysMount Point = "/boot" is not a mounted partition. Is the path configured correctly?
Traceback (most recent call last):
File "/nix/store/78nn18wq36j6i6ndfcbsfc4ddm6yhk3h-systemd-boot/bin/systemd-boot-builder", line 385, in <module>
main()
File "/nix/store/78nn18wq36j6i6ndfcbsfc4ddm6yhk3h-systemd-boot/bin/systemd-boot-builder", line 366, in main
subprocess.check_call(CHECK_MOUNTPOINTS)
File "/nix/store/sxr2lqfkwhxbqgr149b8krncqzi68sim-python3-3.11.8/lib/python3.11/subprocess.py", line 413, in check_call
raise CalledProcessError(retcode, cmd)
subprocess.CalledProcessError: Command '/nix/store/4ybawd7779u972sp89lw5jxxbv4rwc01-check-mountpoints' returned non-zero exit status 1.
warning: error(s) occurred while switching to the new configuration
Checking /etc/nixos/hardware-configuration.nix and there was no boot partition. No idea why, but the solution is just use the manual installation method (more on it below).
1. Setting Up the Virtual Machine for success
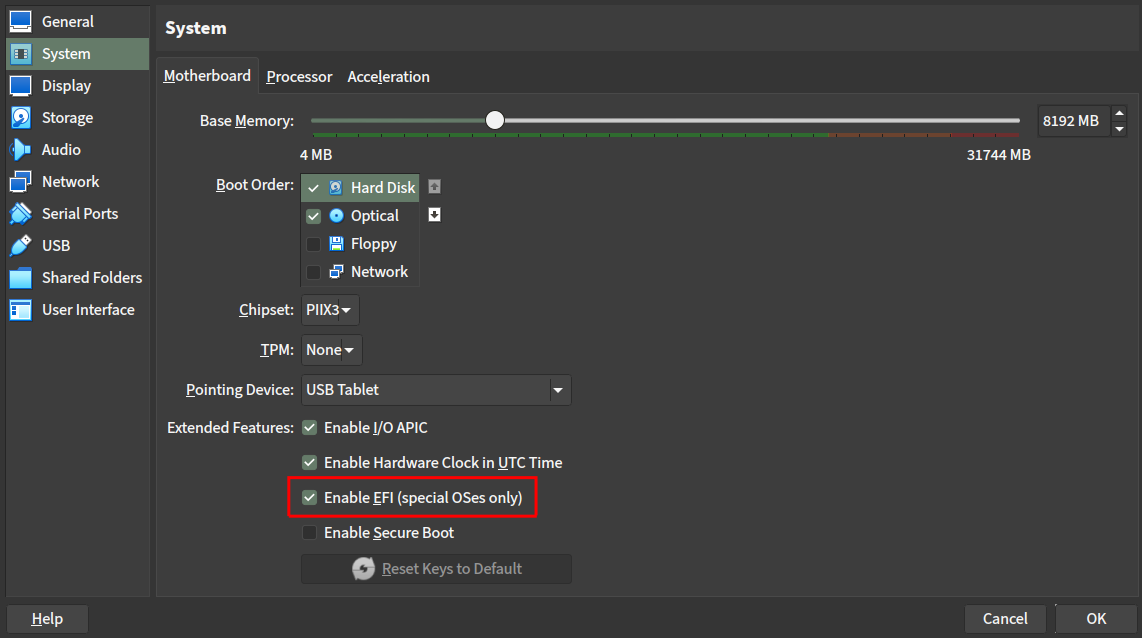
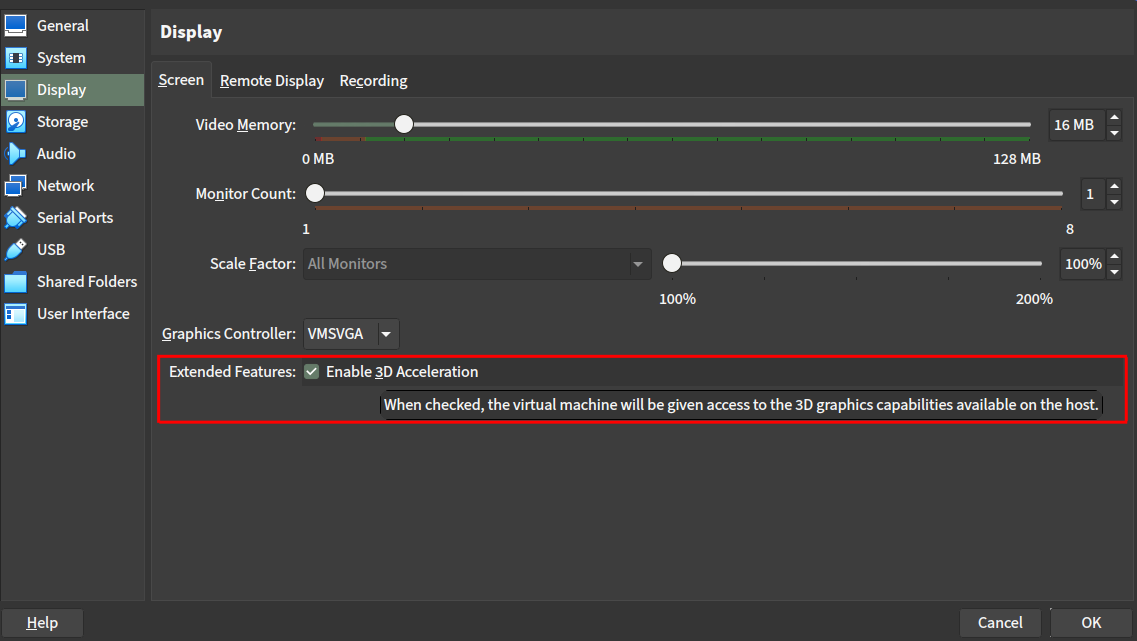
Enable the following VM settings:
- System > Motherboard > “Enable EFI (special OSes only)” (Legacy BIOS doesn’t work)
- Display > Screen > “Extended Features: Enable 3D Acceleration” (Hyprland needs it):
- System > Processor > “Enable Nested VT-x/AMD-V” (not sure if really needed but whatever)

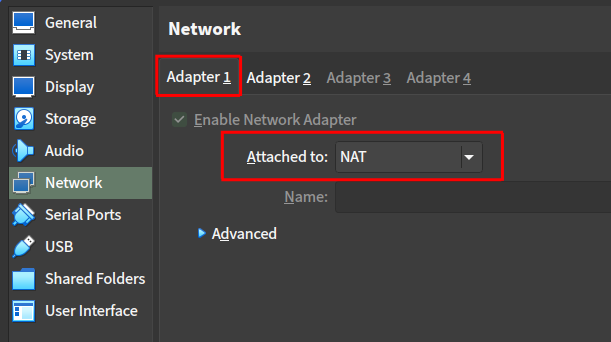
The following is to enable SSH from host to guest:
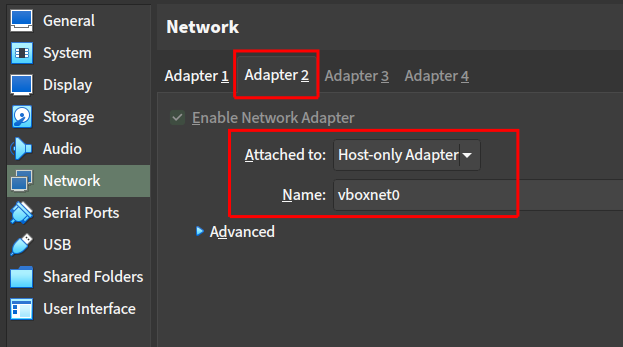
Go to Network settings:
Adapter 1
Attached to: `NAT`
Adapter 2
Attached to: `Host-only Adapter`
Name: `vboxnet0`
2. Booting into the Minimal ISO image
After booting into the Minimal ISO image, read the manual installation. If you want a follow-along video, [NixOS] - #2 Installation is a very good option.
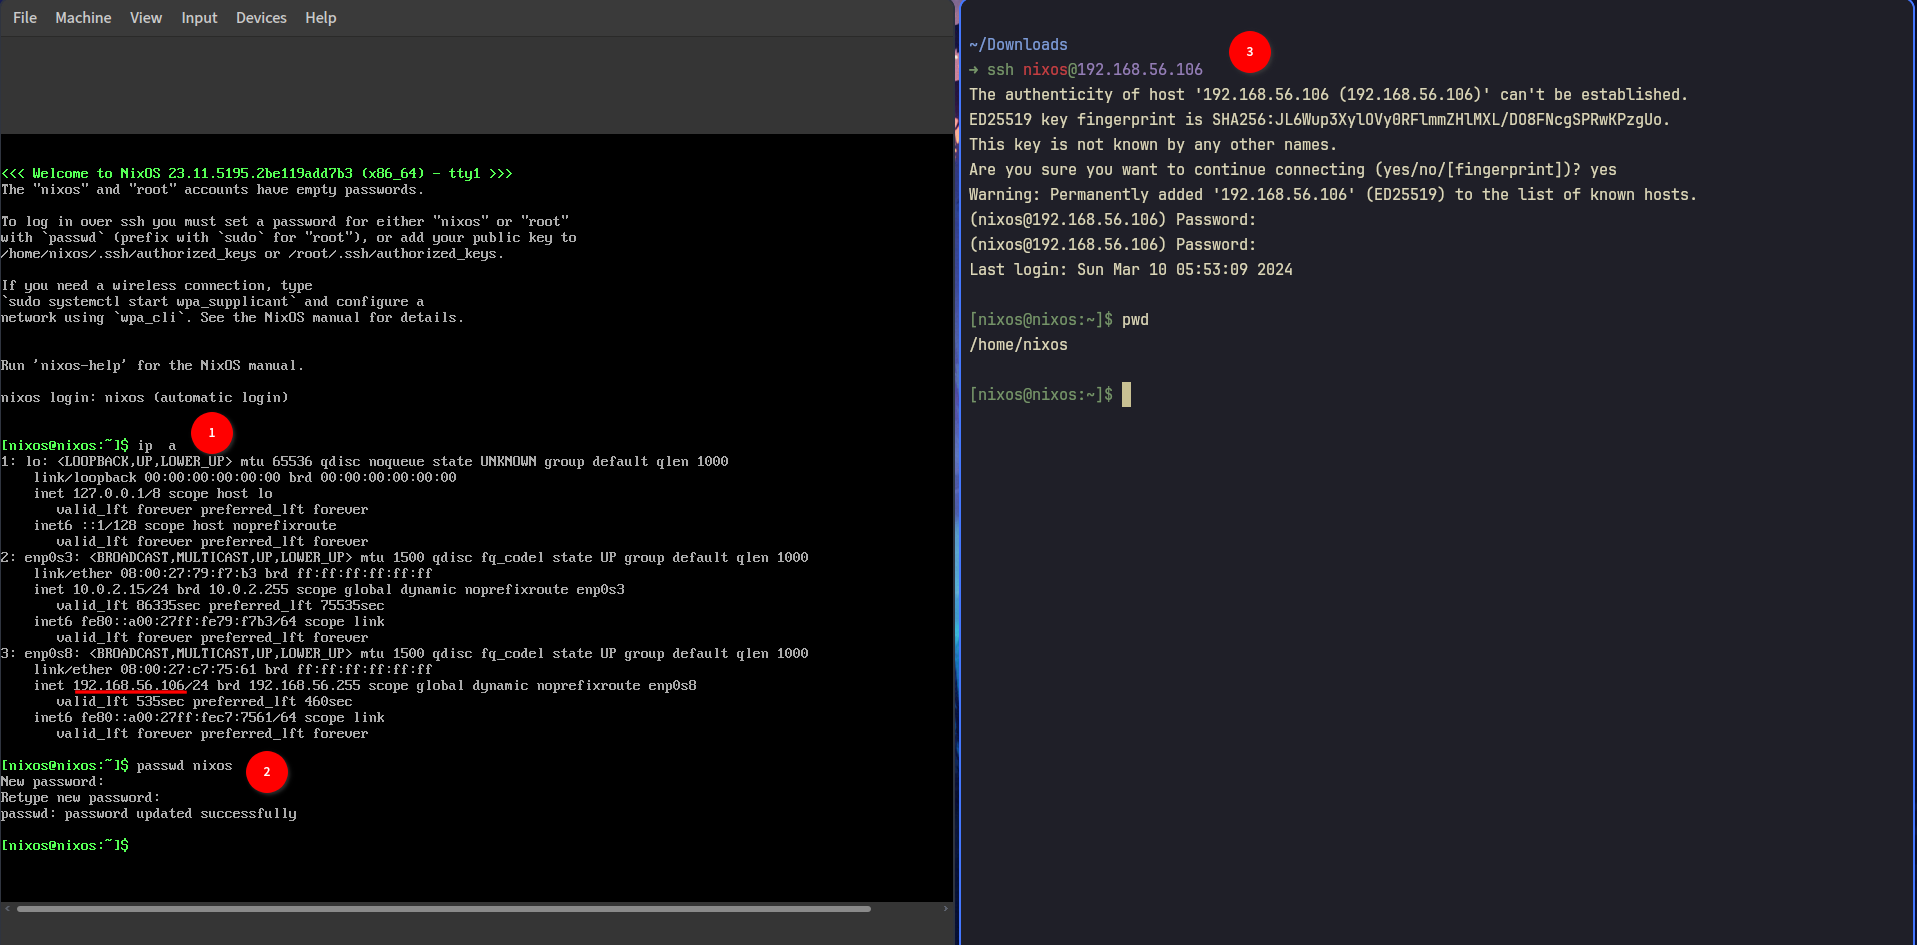
3. SSH into our VM
4. Partitioning and formatting
If you don’t want to read the above, I have the following TL;DR solution that you can just copy and paste:
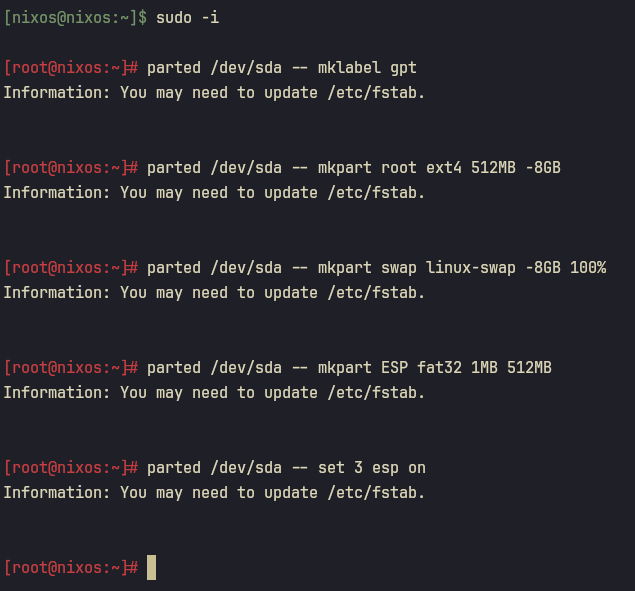
I. Partitioning
sudo -i
parted /dev/sda -- mklabel gpt
parted /dev/sda -- mkpart root ext4 512MB -8GB
parted /dev/sda -- mkpart swap linux-swap -8GB 100%
parted /dev/sda -- mkpart ESP fat32 1MB 512MB
parted /dev/sda -- set 3 esp on
II. Formatting
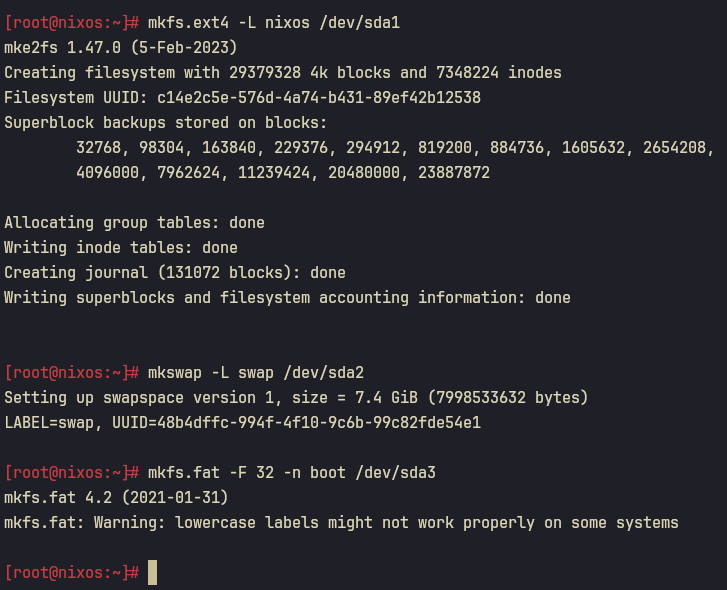
sudo -i
mkfs.ext4 -L nixos /dev/sda1
mkswap -L swap /dev/sda2
mkfs.fat -F 32 -n boot /dev/sda3
5. Installing
mount /dev/disk/by-label/nixos /mnt
mkdir -p /mnt/boot
mount /dev/disk/by-label/boot /mnt/boot
nixos-generate-config --root /mnt
nano /mnt/etc/nixos/configuration.nix
Make sure you have the following configuration.
  networking.hostName = "nixos";
  networking.networkmanager.enable = true;

  nix.settings.experimental-features = [ "nix-command" "flakes" ];

  virtualisation.virtualbox.guest.enable = true;
  system.copySystemConfiguration = true;

  services.openssh.enable = true;

  users.groups.yourusername = {};
  users.users.yourusername = {
    isNormalUser = true;
    group = "yourusername";
    extraGroups = [ "wheel" ];
    packages = with pkgs; [
      firefox
      curl
      wget
      git
      vim
    ];
  };

  environment.systemPackages = with pkgs; [
    firefox
    curl
    wget
    git
    vim
  ];
Quit the configuration.nix and run the following:
nixos-install
Remember to set the root password:
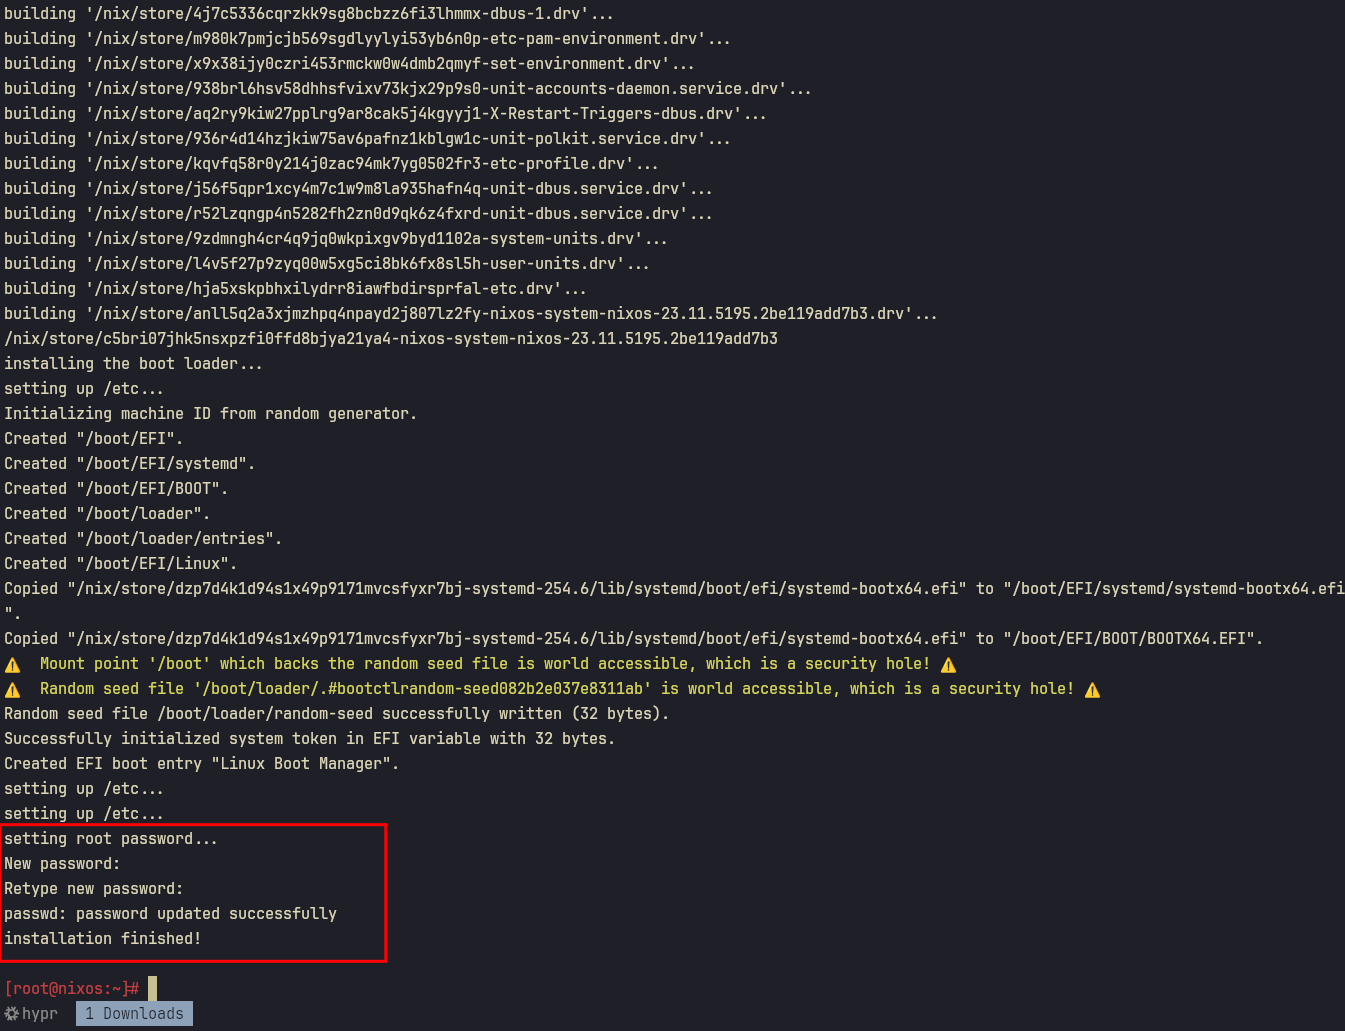
Then reboot
6. Continue setting up in VM
The SSH connection is then broken. Go back to the VM and you will see the TTY. Log in as root:
root
Change the password for yourusername:
passwd yourusername
At this point, I recommend making a VirtualBox backup by clicking to Export to OCI...:
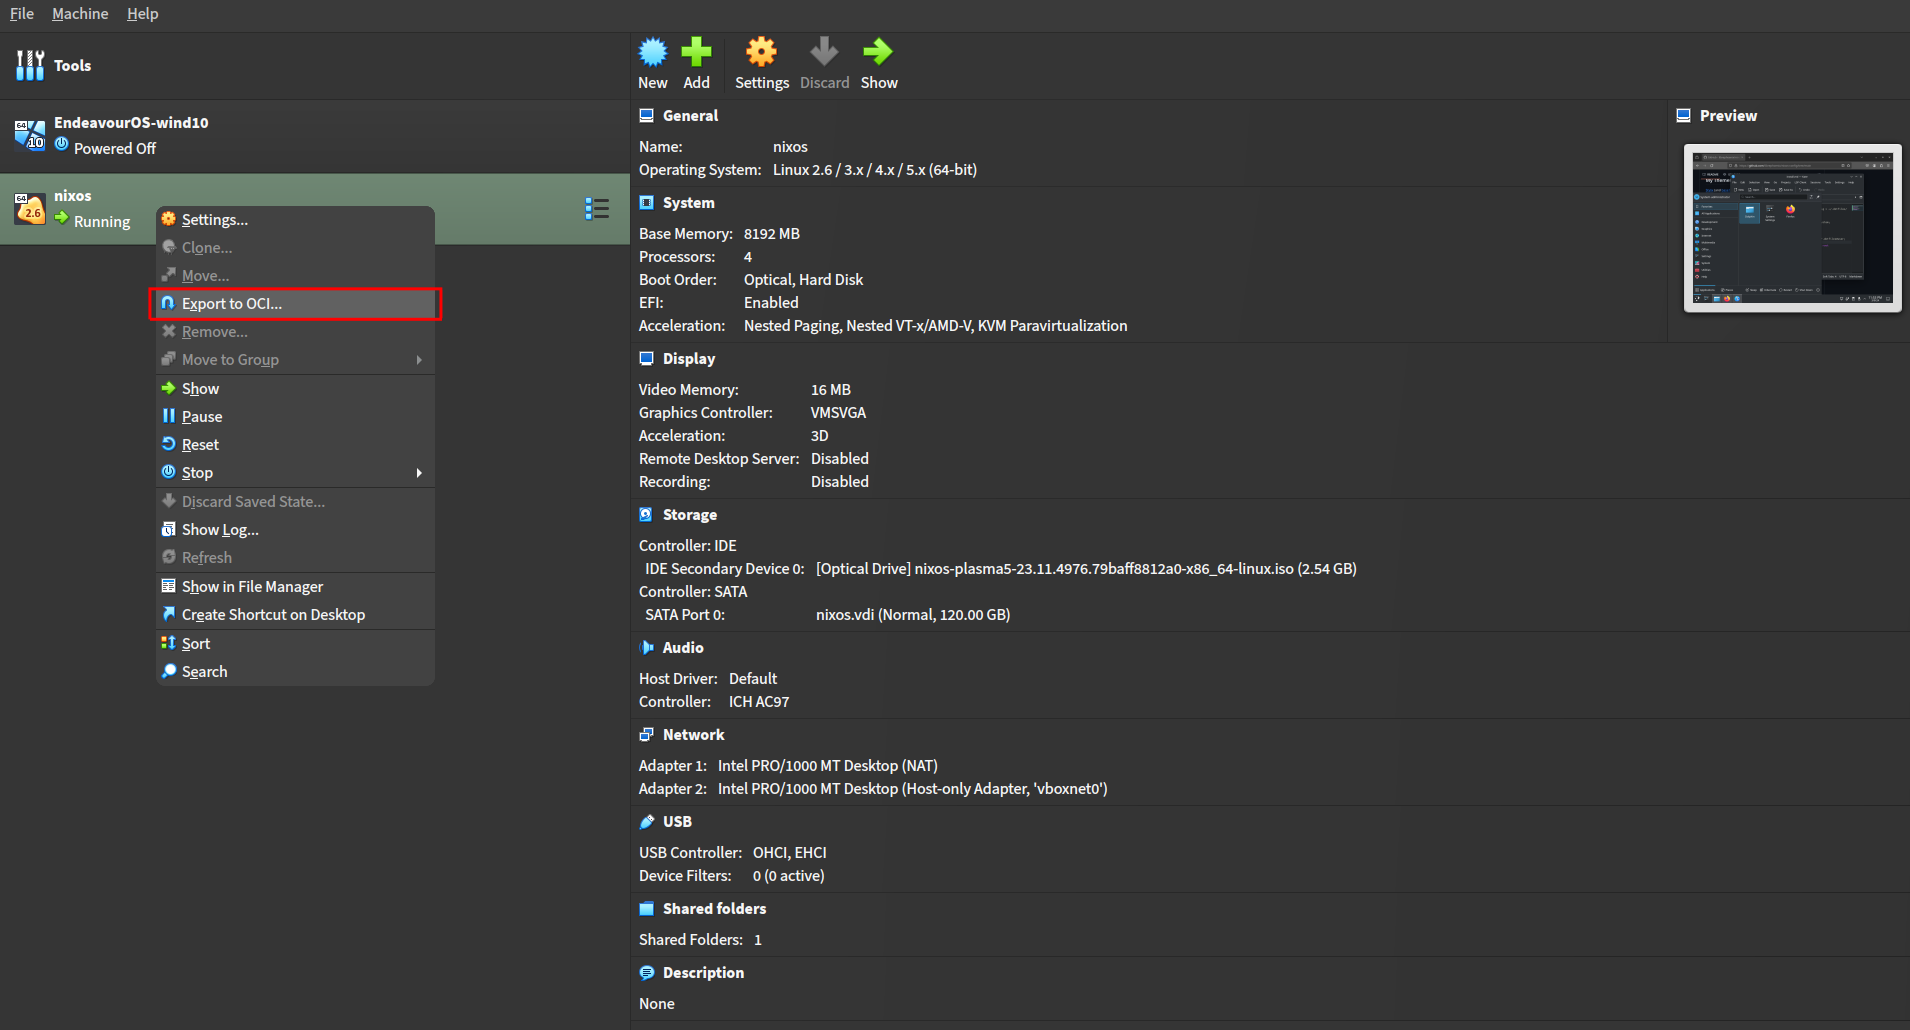
I thought rolling back in NixOS was a breeze?
While rolling back in NixOS is straightforward, operations such as sudo nixos-rebuild switch and nix run home-manager/master -- switch --flake ~/.dotfiles#user are not atomic transaction. If it installed half-way and borked, debugging is harder than re-installing again.
7. Install librephoenix/nixos-config with one command
Let’s SSH back into our nixOS guest machine:
ssh yourusername@private-ip-address
Install librephoenix/nixos-config with one command:
nix run gitlab:librephoenix/nixos-config
And we wait patiently and watch the magic happens.
When you see the beautiful wallpaper and alacritty shows up when you press Super+Return, it means you’re done! Congratulations!
Tips
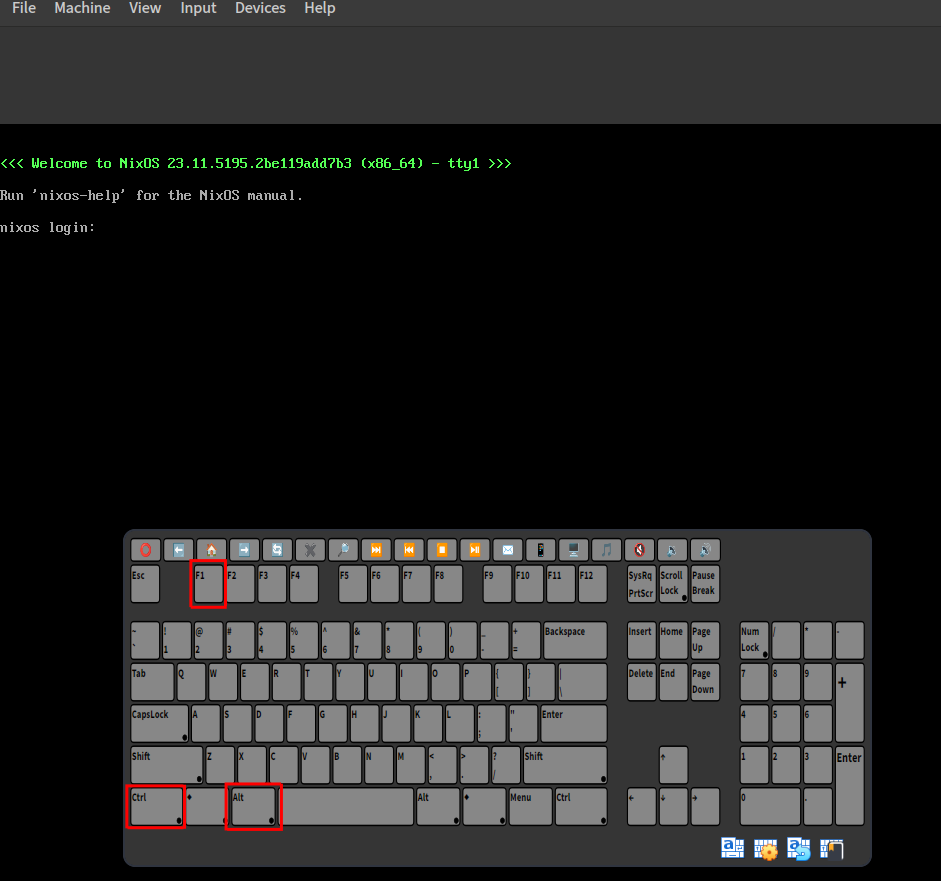
1. Use “Soft Keyboard” to go back to TTY for debugging
It happened to me before: in the login manager, after typing the password, I can’t log into Hyprland (because I forgot to enable 3D Acceleration in VirtualBox). We can debug by going back to TTY.
In the topbar of the VM, click “Input” > “Keyboard” > “Soft Keyboard” and click Ctrl+Alt+F1 to go to TTY:
Go and check the log:
cd /tmp/hypr/
2. DO NOT use the automatic installation script install.sh
It’s still experimental and might not work. Besides, it makes it hard to catch any potential errors (and this was my 27th attempts). We can follow the Manual Install Procedure.
3. Sharing host directory with guest’s
We can use the “Shared Folders” feature to map host ~/.dotfiles to the guest’s ~/.dotfiles. The purpose is we can use our host’s environment (neovim) to edit the config, and only need to run sudo nixos-rebuild switch --flake ~/.dotfiles#system in the guest machine.
Go to
Settings>Shared Foldersand create a shared folder.Run the following in the guest nixOS:
mkdir ~/.dotfiles
sudo mount -t vboxsf librephoenix-shared ~/.dotfiles
- Edit the files from your host’s
librephoenix-sharedand the changes should be reflected in the guest NixOS.
Conclusion
It was a challenge to get it installed. Hopefully, you have a better time installing NixOS on a VirtualBox VM.